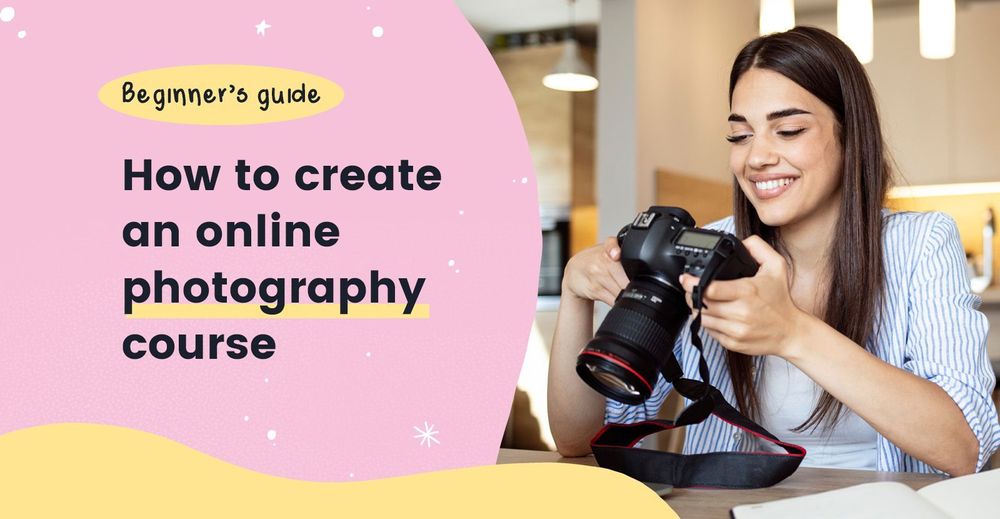
Five essential steps to designing an online photography class
HOME - GUIDES - ONLINE PHOTOGRAPHY COURSE
Follow this step-by-step guide to learn the process of creating an online photography class using CreativeMindClass, a free tool utilized by some of the most renowned creators.
- Start creating your online photography course
If you're just starting out or an experienced professional making an online photography program could be stressful. There's an endless amount to consider and plan. Starting with the concept, you can research, videos to launch and more. A great plan sets your students up for success. It allows you to organize each detail to focus on creating the most memorable learning experience for your students.
In this tutorial we'll teach you the 5 essential steps to creating an effective online photography course...
1. Online course plans You can set up the space where you will develop your online course
2. Course topic Figure out your course's topic and the students you'll instruct.
3. Course outline Plan each course you'll need to take
4. Content delivery Create video clips, downloadable files, as well as exercises
5. Course website Persuade your audience to buy with texts and images
1. Online course plan
Set up a place to create your online course
A typical online course could be spread across social media, websites and payment sites, as well as messages emails, laptop folders. The central online course brings all the various elements into one convenient place. It will evolve over the course's duration. course but usually includes:
- Introduction
- Work Examples
- Gear information
- Inspiration
- Planning
- Project
- Photoshoot day
- Editing
- Summary

What is it? in CreativeMindClass
- Click My Classin main menu to open it.
- Click the Add a Class button to start a new course.
2. Topics for the course
Decide what you'll teach and whom you'll instruct.
Beginning your photography online course can be stressful as it is necessary to create something that buyers will want to buy. However, a well-thought out course topic will ensure your success.
The subject for a course is a simple yet powerful idea to create your course to appeal to the appropriate audience. Photography is your thing You have the expertise as well as skills that people are prepared to invest in. It's time to look at the subject more closely and explain it in words.
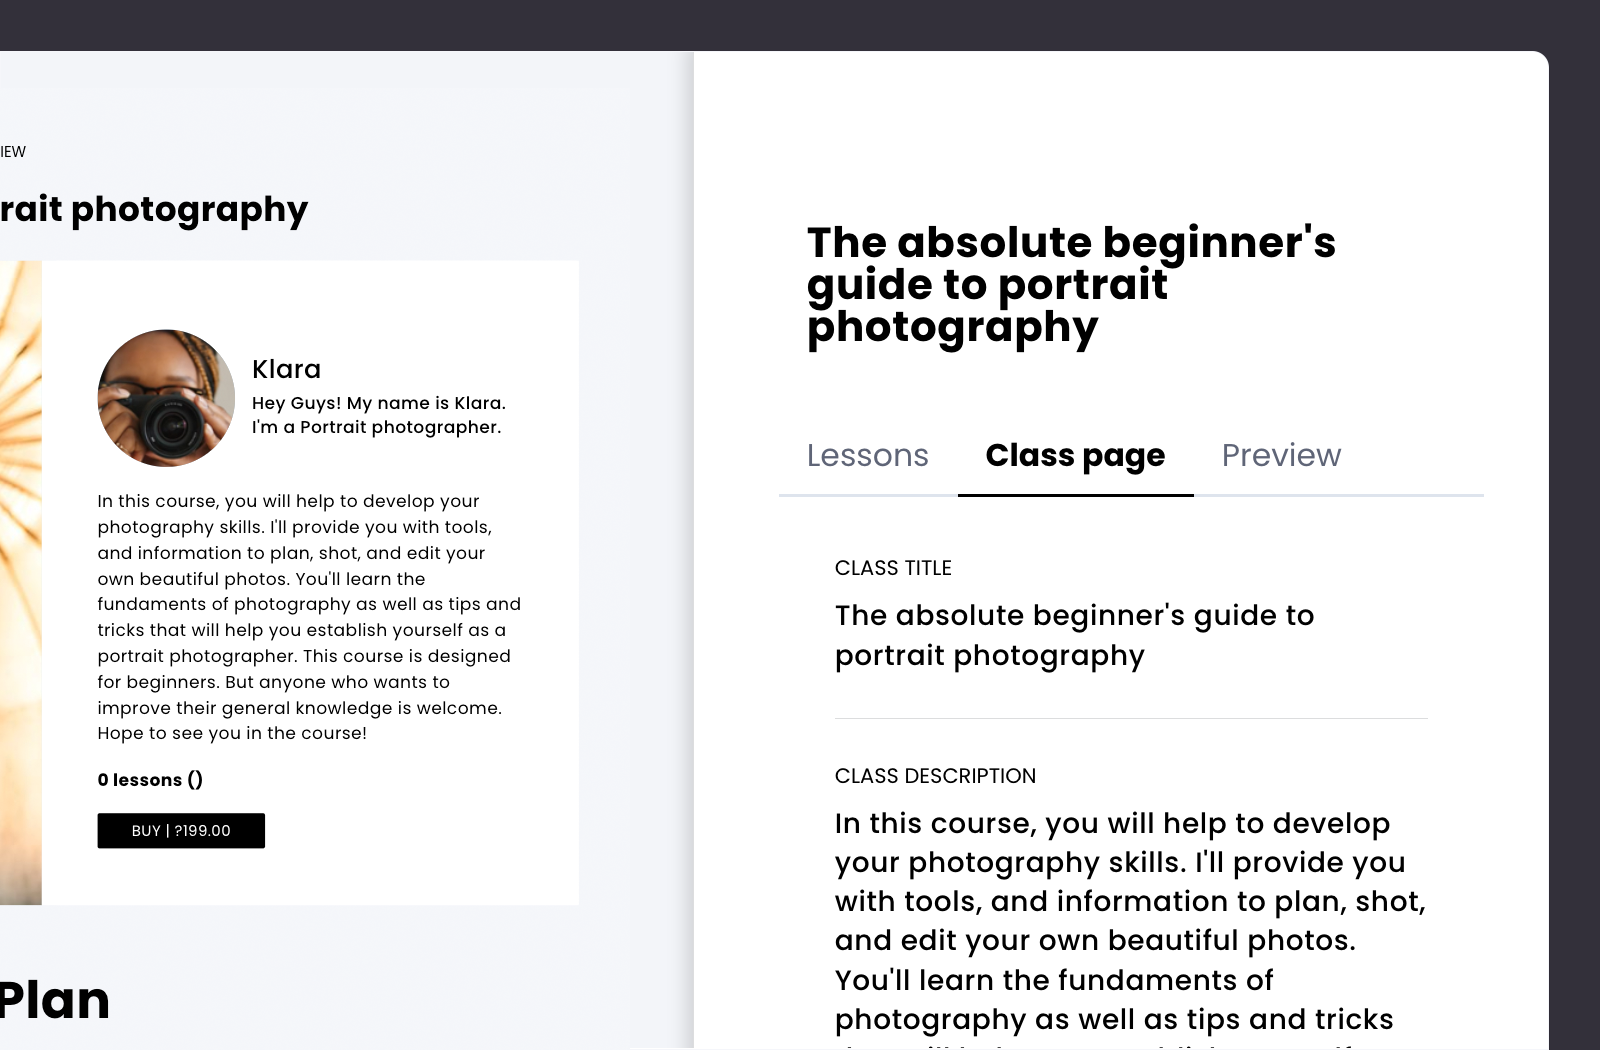
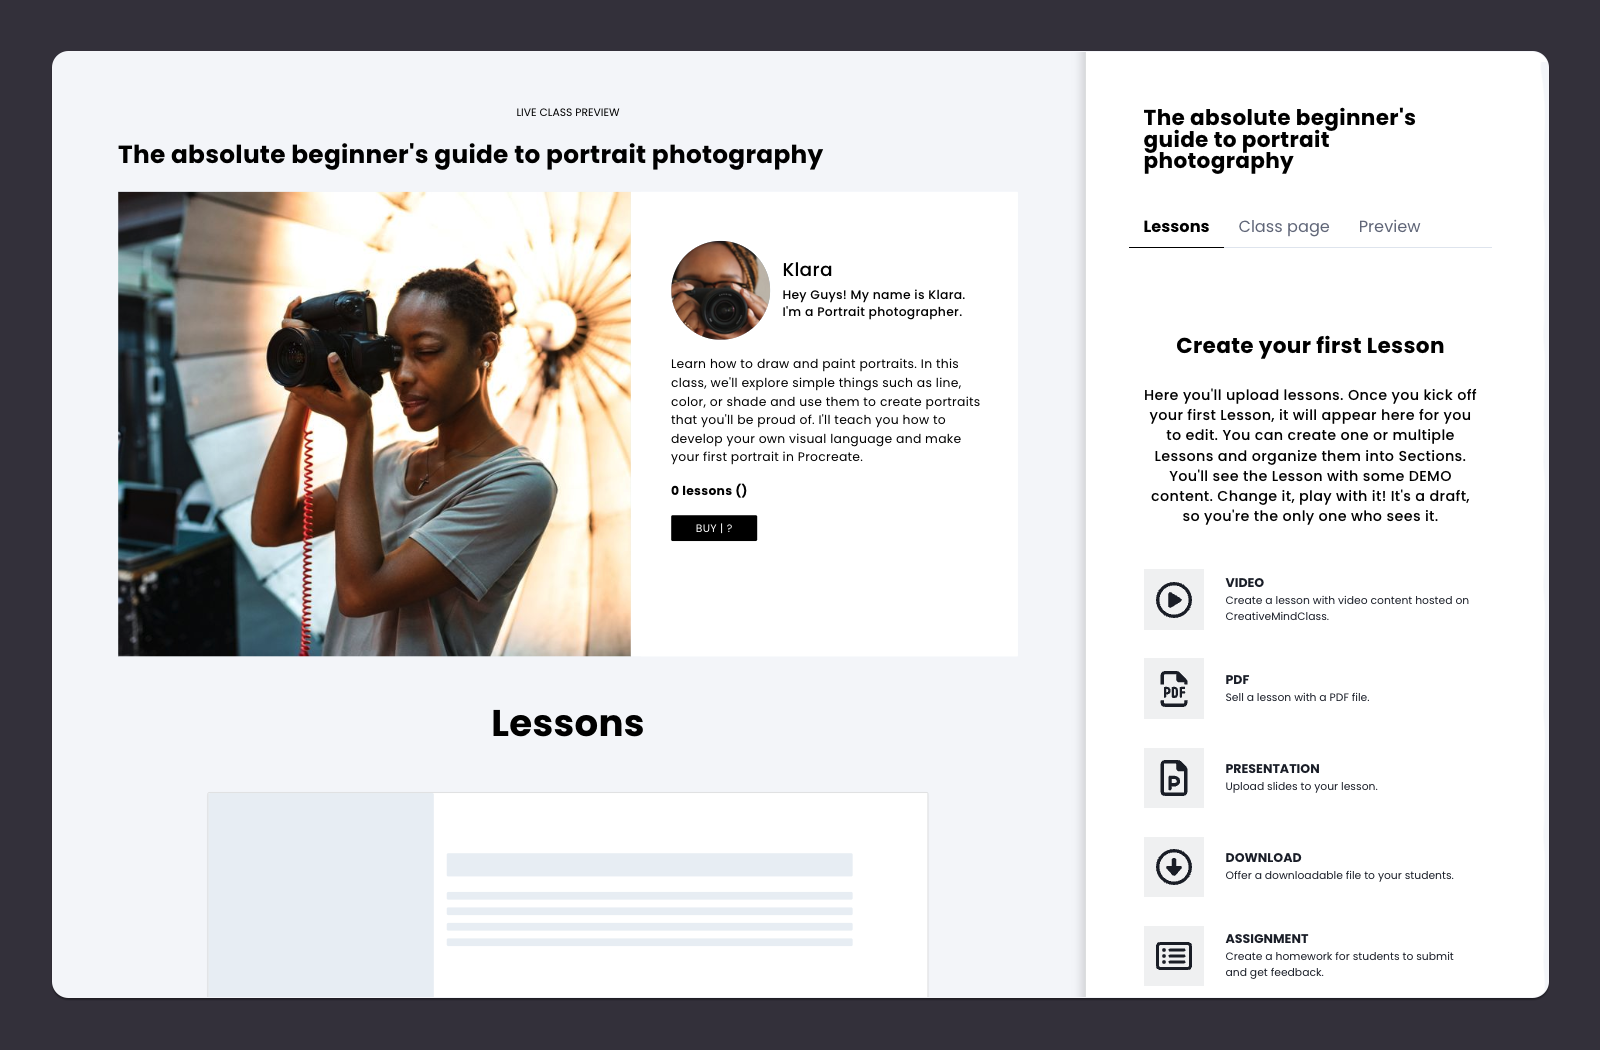
First, open the Class page
The Class page is a tab under the class. Then click the class page tab to open it and start creating your course's name and description.
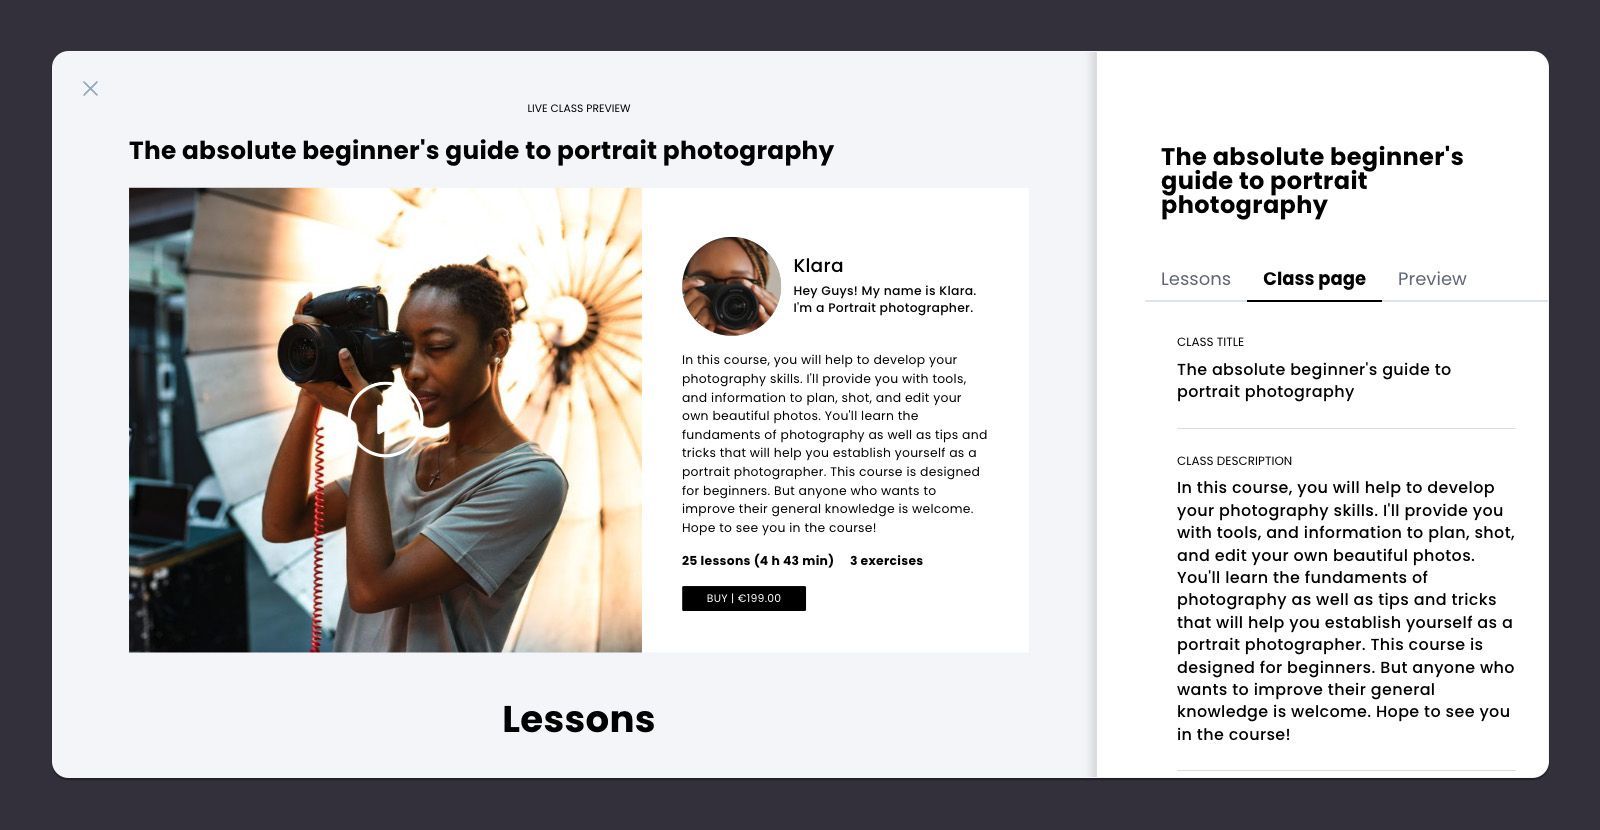
What is it? in CreativeMindClass
- Click the the Class tab to open the page. tab to open it.
Specify what you should teach
What kind of photography do you do? What is it that you enjoy about it? How do other people come to you for advice about? What do you want to study? This will help you find a topic you're most comfortable with, making the course creation time much easier.
Pro Tip: Teach what you're passionate about, are familiar with, and what people want to learn. This way, you'll have plenty of subjects you could start putting together right now.
Give your course a name
A clear, catchy, and benefit-focused title helps readers make a swift decision. It grabs focus and gets them to look up and think, "Yes, I want to purchase it!". Make use of powerful words that stimulate emotions, and create the reaction that gets them to read, click and buy.
How do I get it in CreativeMindClass
- Write CLASS TITLEto identify your class. Example: "The ultimate beginner's guide to photographer".
Make an offer (and identify people who would buy it)
What are the lessons that people will be able to learn? Do you intend to concentrate on editing or photography? Are there any potential students for this program? What particular high-pain issues do you address? Do you have competitors that offer similar courses? As you work on the proposal, locate someone who is interested enough to invest money in order for the opportunity to study it.
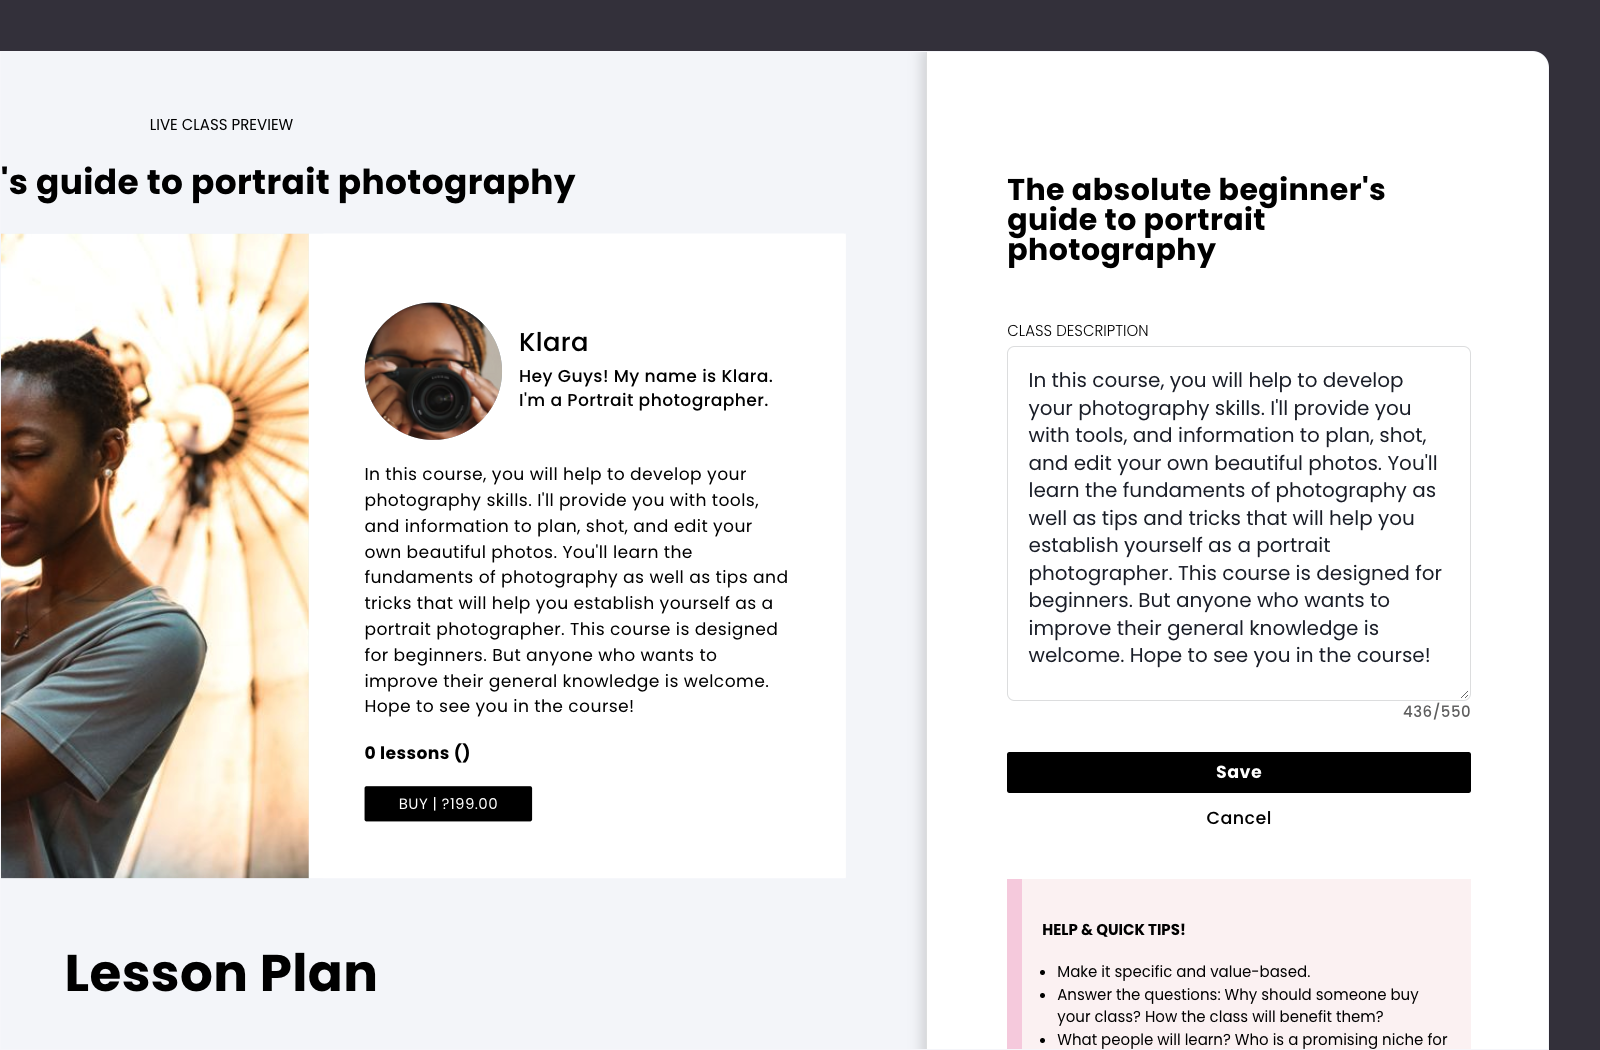
What is it? within CreativeMindClass
- Type the class descriptionto communicate the class description to communicateyour offering.
You've finished the course subject!
Once your topic is complete, you have the most effective and realistic proposition for your online photography course. Make sure you make multiple classes that explore the various subjects of your course, and to test them.
We'll then make a plan of action so that there's nothing you miss while recording the video...
3. Course outline
Plan each lesson you need.
Planning the entire online photography course can seem difficult. Sorting through piles of content creates a risk of confusion in selecting what should be included in an online photography program. A clearly-defined course outline will make sure it's manageable.
An outline for a course is a list of things to do of every video you want to make during the course of filming the course. It usually contains a list of particular lessons, with notes about content details and the learning outcomes to ensure that you won't miss a single thing.

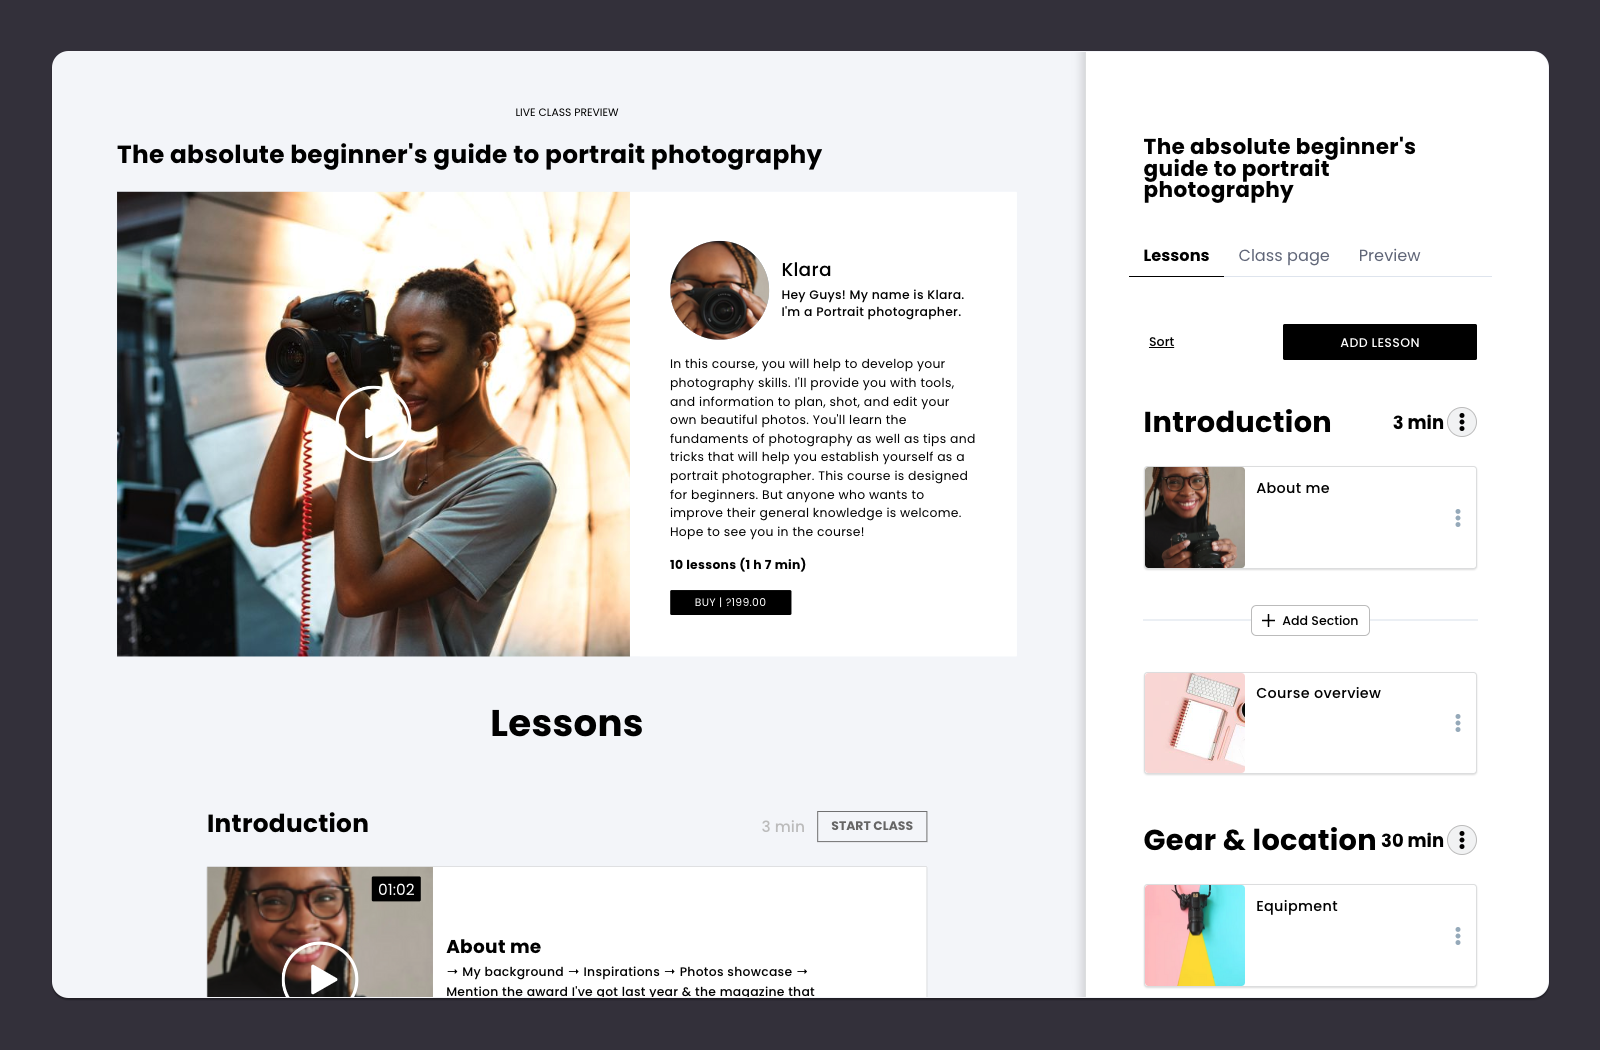
To begin, first, start the Lessons
You'll find the Lessons tab within the class. Click on the Lessons tab to open it up and start creating your lesson plans.
What is it? within CreativeMindClass
1. Click the LESSONS tab to display it.
You should list the items you're writing about
Begin by listing the main subjects and elements you want to cover. It could be as simple as opening yourself up, showing off your most impressive work such as a course overview, the gear lighting, hands-on projects as well as post-production editing and finally, the conclusion. Don't get into specific details yet. What could you cover in 3-10 minutes video lessons?
How do I get it in CreativeMindClass
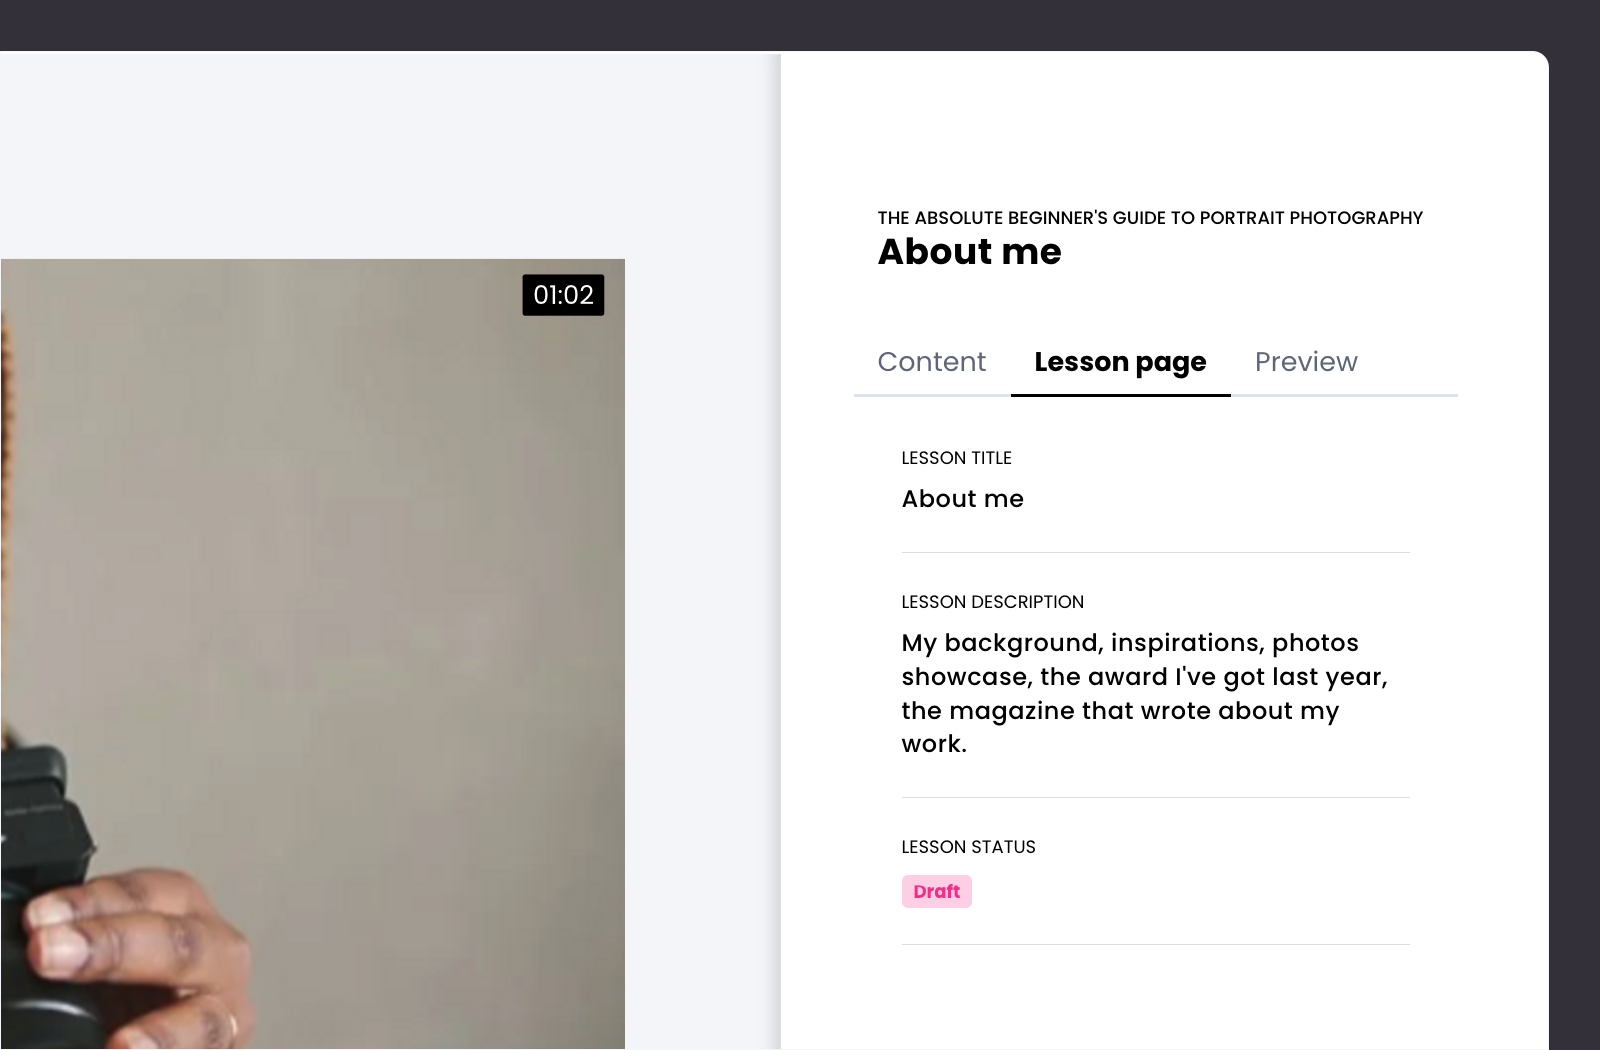
- Click the Add LESSON click to create the new lesson.
- In Lesson page tab, type LESSON TITLE. For example "About me".
- Incorporate 10-20 lessons into the course. For example "Course outline", "Equipment", "How to master composition", "Editing", "Conclusion"etc. Pro Tip: Try to list the subjects quickly and then type in the title of each lesson without pondering them too much. You can change them later.
Indicate the specific learning results
The heart of your lesson list. It's the place you record all the important points for each lesson you want to keep track of. Think about specific learning outcomes as well as content that addresses the needs of your students or figure out the gaps not met by your competitors.
How to do it in CreativeMindClass
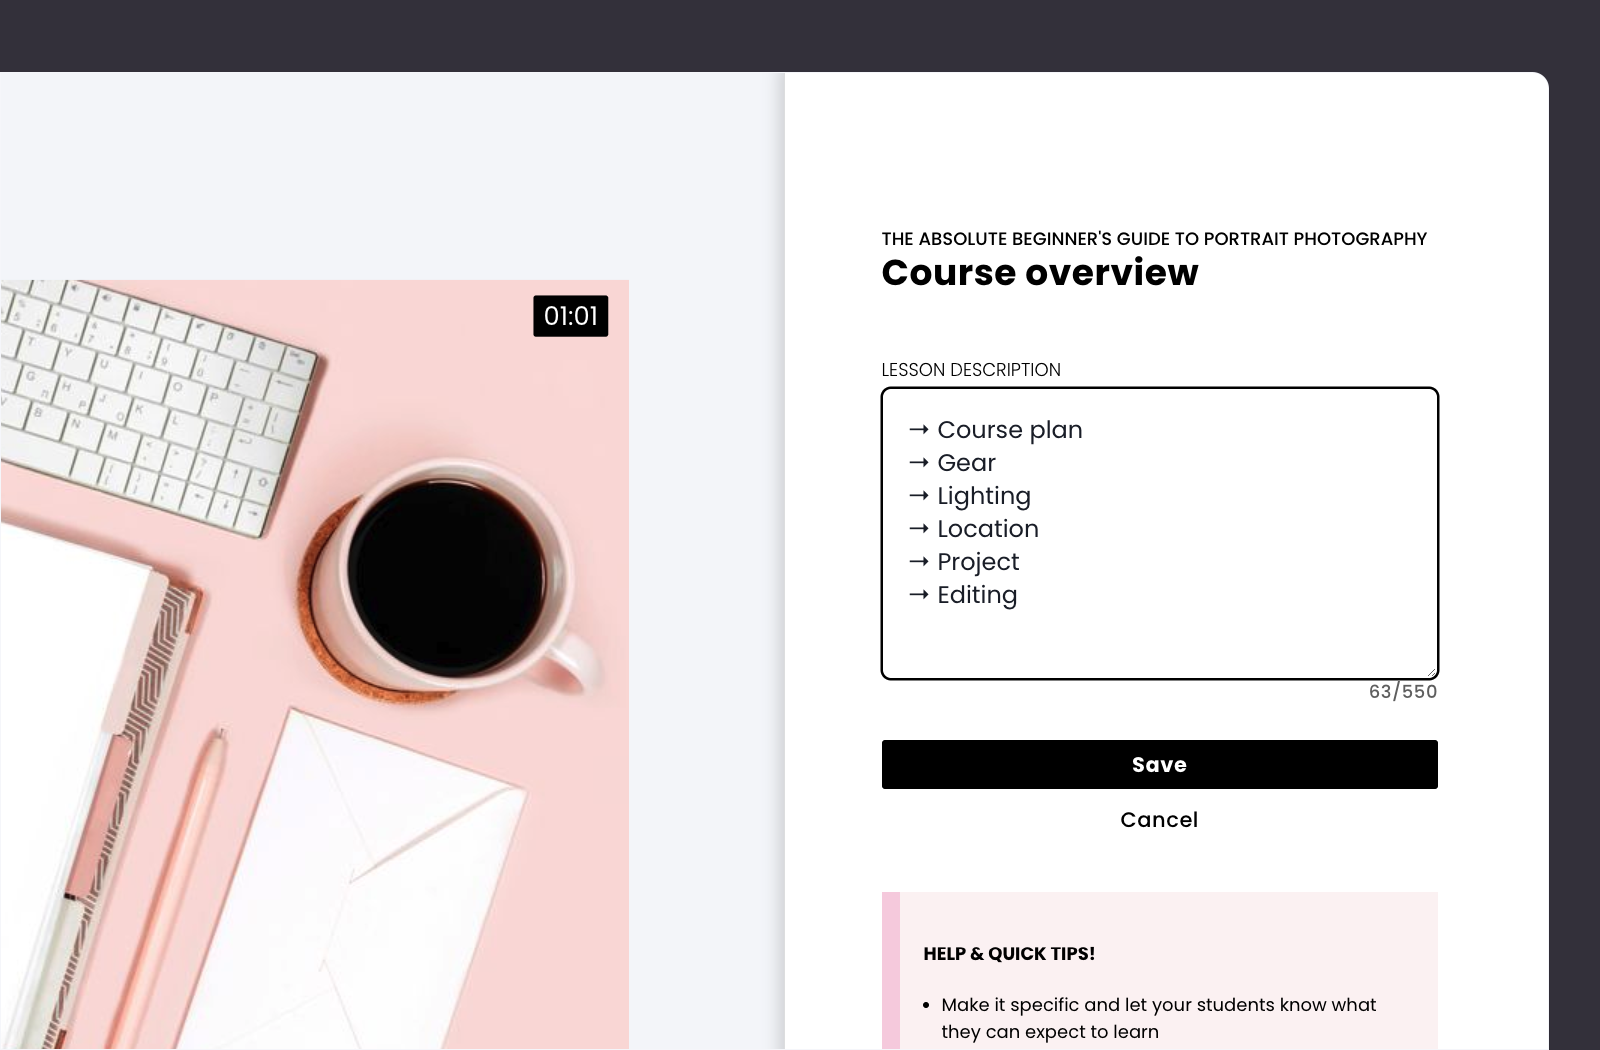
- Navigate to "Course overview" lesson.
- Type LESSON DESCRIPTION to create your lesson outline. For example "Course plan, gear, lighting, location, project, editing ".
From messy to well-organized
You might have created the lists of lessons that it's too long or unclear. If there is a lot of information to cover, consider splitting your class into segments. Eliminate the lesson that don't provide a clear outcome for learning. Make sure to take your time at this stage so you don't end up with a long-lasting practice.
How to do it within CreativeMindClass
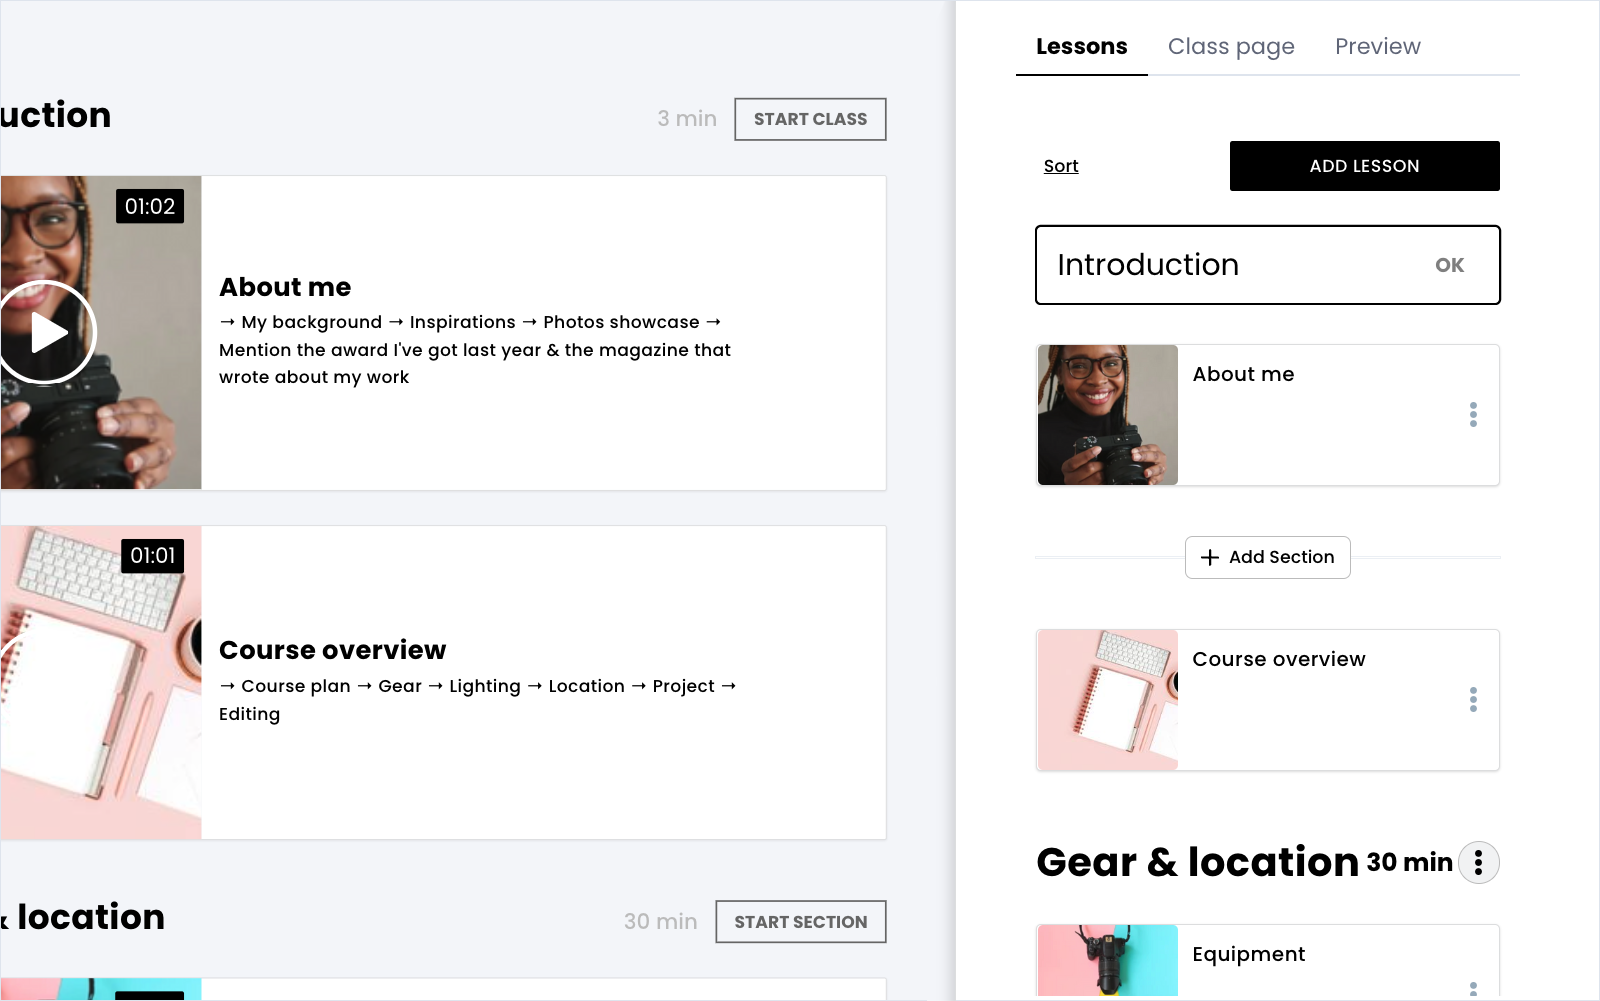
- Click Add Sectionbutton to add a section.
- Type Section title. For example "Introduction" section to include "About me" and "Course outline" lessons.
- Add more sections to group your classes . PRO TIP: Group your common themes, suggestions and suggestions into segments. The lessons in those sections in the most orderly way.
It is a reference on the video recording day
Traditionally you'd print out your to-do list to refer to during filming. Nowadays it's possible to have a list of tasks to be accessed on phones or laptops. It allows you to make sure that each lesson is completed or adjust it as you need.
You've finished the lessons checklist!
Now that your course outline is complete, you are prepared for your video recording.
We'll then discuss the best way to deliver and record your content...
4. Content delivery
Create videos, files that you can download, and work outs.
After you've got your outline of your course in place now is the time to start thinking how you can present every part of your photography online course.
Video lessons include engaging, interactive, and fun content which offers a wonderful learning experience for students who are online. The best way to deliver the learning results is to mix different multimedia: videos and screen recordings, slideshows as well as audio and handouts and exercises.
Look at your lessons list. What method fits best for delivering the outcomes from every lesson?
To begin, first, you need to start the Lessons
There are lessons within the Class. The Lessons tab is the first to open it, and begin creating multimedia for every lesson.
What is it? in CreativeMindClass
1. Click on the the LESSONS tab to open it.
Add a video to every lesson
Videos are the most enjoyable method of presenting your information. Videos can have different types, including presentations, or screen recordings that include audio It doesn't necessarily mean that you need to be on camera all the time.
As a photographer, you are fortunate that it might be easy for you to pick up an electronic camera to begin making videos. Videos can be produced using the gear and shooting space right at home with the knowledge you have available.
Once you're finished recording and editing your videos there are a variety of small, 16:9 high-quality video files to upload. Be aware of the top quality of your video. Resolution must be at least 1080p.
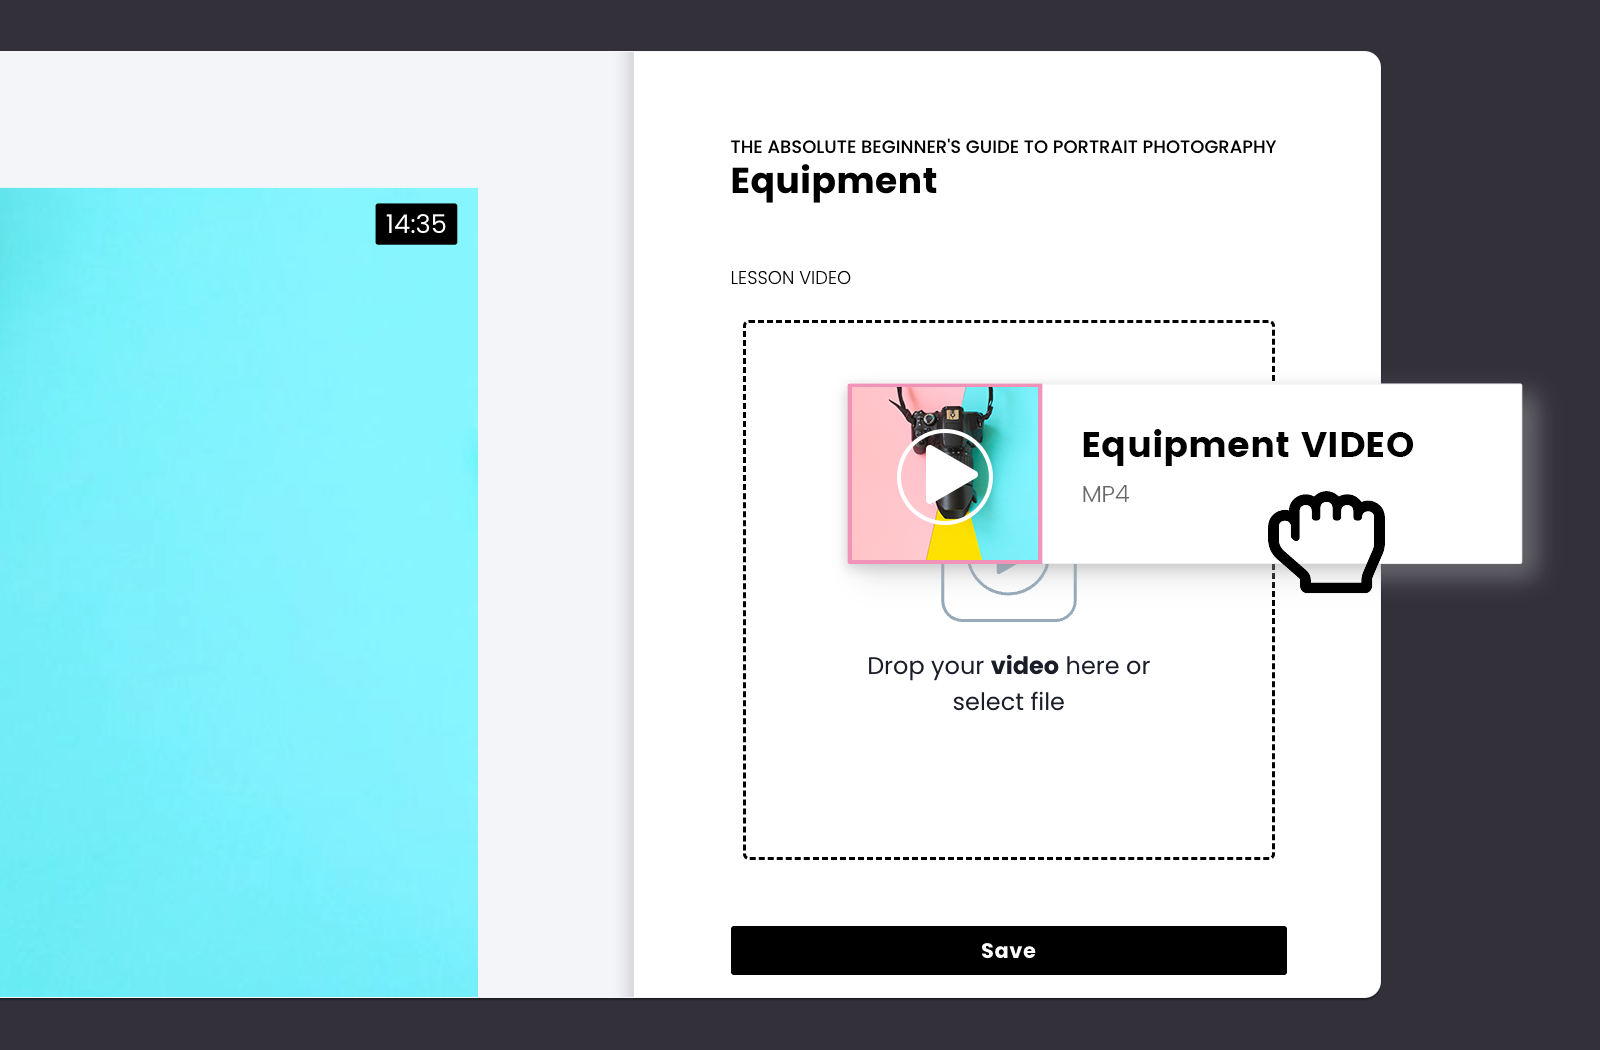
How do I get it within CreativeMindClass
- In LESSON, select VIDEOlesson type.
- Download a video from your PC.
- Make sure to include a video with every class. PRO TIP: Based on the programs you use to make your video, you'll end up with multiple video file formats like MP4 MOV, WMV, and MP4. You don't have to worry about it, the videos will automatically convert to formats that your students can view on their laptops, desktops, or mobiles.
Create a file that can be downloaded
Downloadable files are a great addition to your lesson. Downloadable files make your content exciting and enjoyable, and also leave your mark on desks and pulpits of your students. When you add an additional content to your class the students are able to download the file, print it, fill it in, or alter it.
You can create video lessons using worksheets, as well as other files or native file formats. Create downloadable files using software such as Pages/Word, Google Slides, Prezi, Photoshop, or Canva. The combination of downloadable files and exercises allows students to upload their files for a class and receive your feedback.
After you've completed the files for download, you have high-quality image files or editable native files to upload.

What is it? within CreativeMindClass
- Navigate to LESSON - Content tab
- Select DOWNLOADABLE FILE to transfer your file.
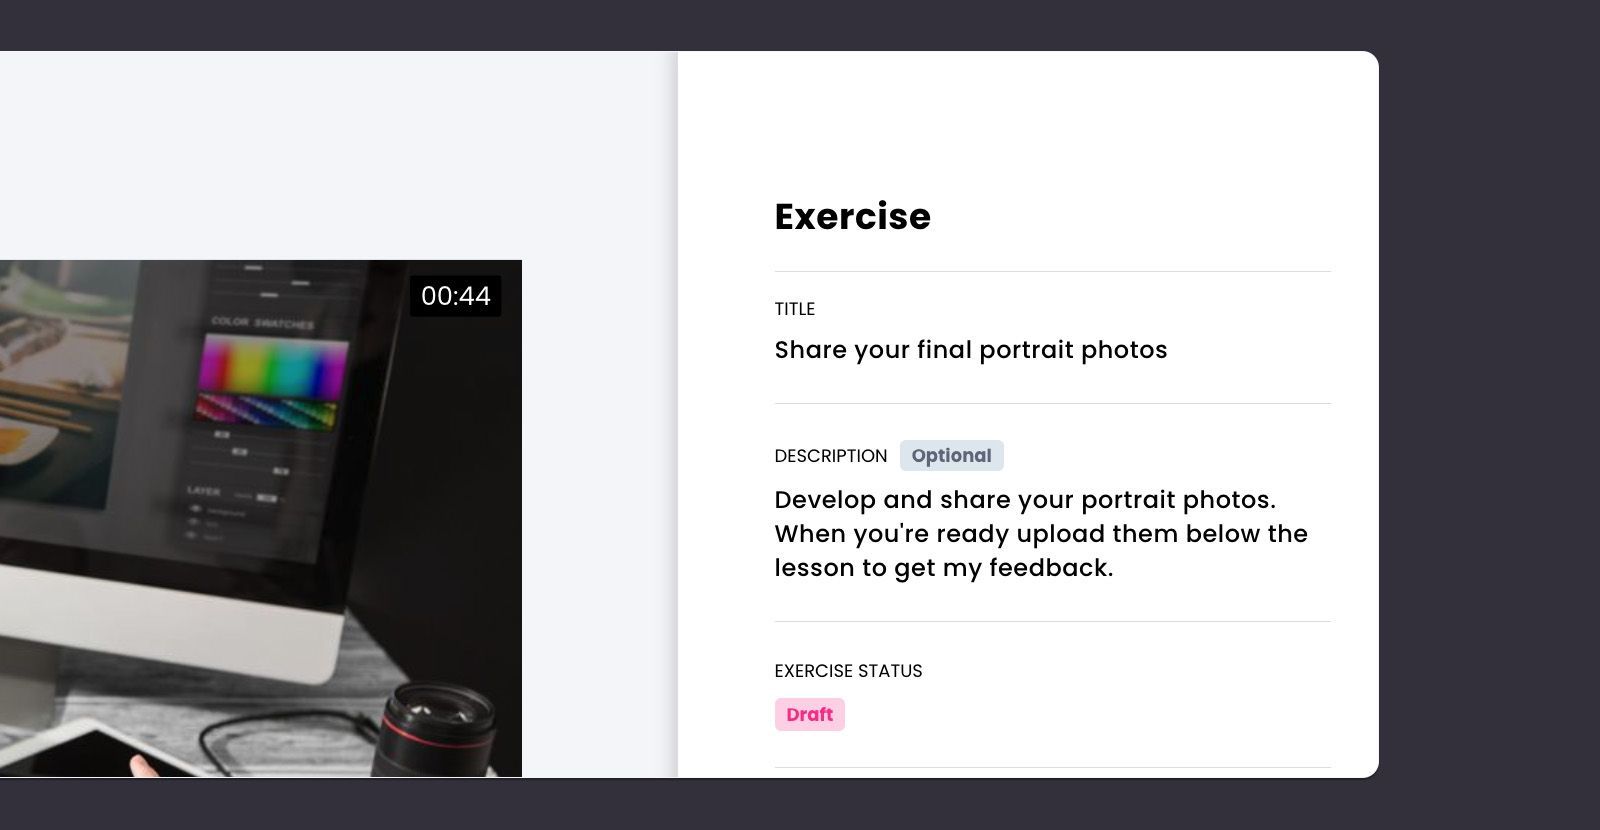
Add an exercise to an existing lesson
Exercises are a great way of delivering learning outcomes. They engage students to learn by doing. Active learning is typically comprised of an activity that is measurable and feedback from the instructor.
Consider the experience you'll create to help students reach their objectives. Look at your Lessons list. What lessons might have exciting and enjoyable activities for learning? Are there lessons that could include homework assignments? Which brainstorming exercises can you incorporate? What is the final project in your course?
What is it? within CreativeMindClass
- Click to LESSON - Content tab
- Click the EXERCISE button to create an exercise for your class.
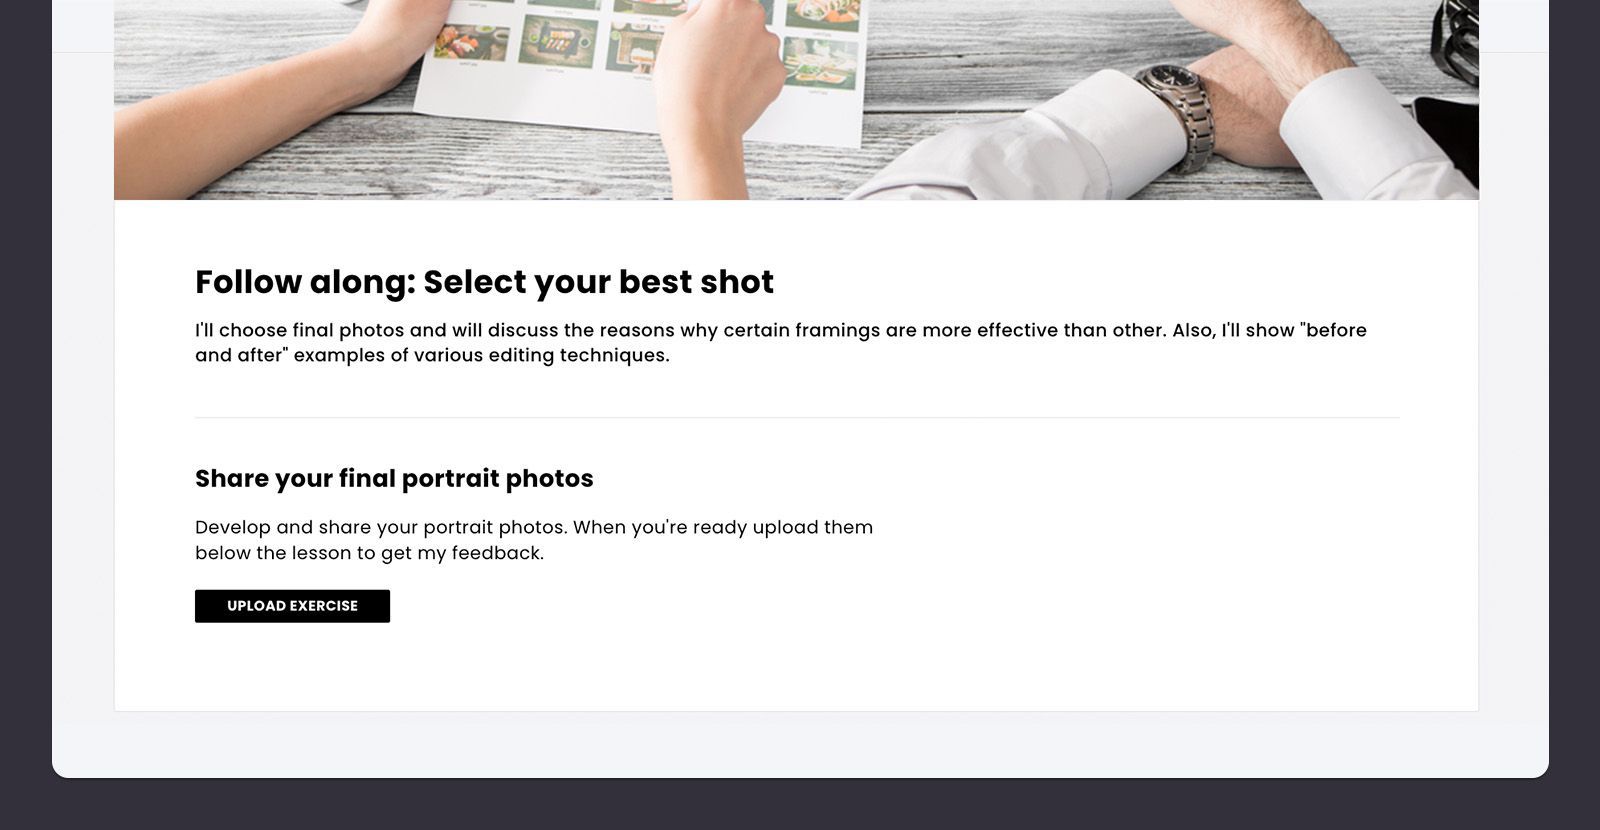
Ask students to share photographs and ask for feedback
The online photography class asks for a final project such as a photoshoot. In the event that you incorporate such exercises for your students, they can snap photographs using the techniques they learn during the course, and upload them into CreativeMindClass where you can give feedback. PRO TIP: The student' final outcomes of your photography online course may be uploaded in the form of exercises. The results will be uploaded to the Activity Feed together with your feedback. This creates fantastic testimonials and social proof for your course website.
How to do it within CreativeMindClass
- Click to the tab titled Content
- Click EXERCISE to generate an exercise.
- Write TITLE. For example "Share your final portrait photos".
- Write a DESCRIPTION. For example "Develop and then share your personal photos. When you're ready to upload them, you can do so below the lesson to get my feedback ".
- If your student has uploaded the assignment, go to the student's workto offer your comments.
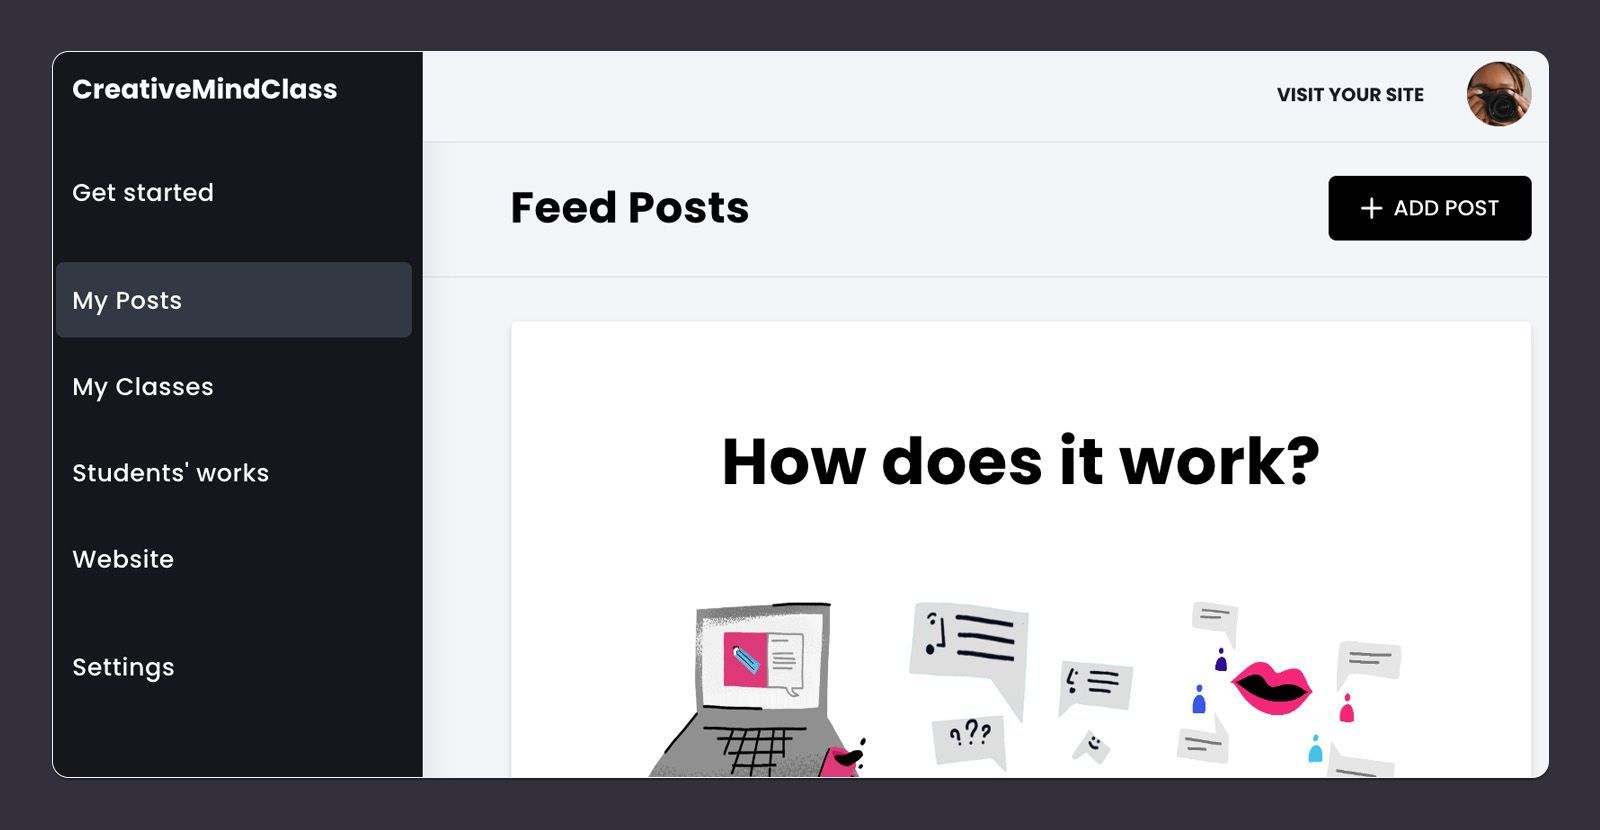
Create an online community in support of your class
Learning activities and your feedback are the first steps toward developing a supportive community for the online course you offer. It is possible to stop there or you can take your students learning experience to the next step. This helps to improve your business's performance and expand your visibility as a brand.
Activity Feed is a place to create an online community. It drives users to your website, helps you retain clients, and boosts your profits.
If you add some motivational posts to your online course website, you'll be able to create the perfect foundation to build a highly engaged community around your business and brand.
How can you maintain your students' attention? What do you usually post on social media? Do you have any tips you can offer on composition, equipment or even software? An excellent way to keep your students engaged and motivated to finish the class is to post daily updates which provide ideas to help them complete their final assignment.
How do I get it in CreativeMindClass
- Click My Postsin the main menu, to launch it.
- Click on the the ADD POST button to make a new post.
You've finished preparing the content!
When your course is complete, you can create a powerful online photography course. It needs a home.
The next step is to make copy, and then upload the images to the course's site...
5. Site for Course
Persuade your audience to buy by using visuals and text.
You've recorded your videos and you're sure you've made an amazing lesson. You're now ready to package and sell your video lessons. The most efficient way to accomplish this is by creating an online site (sometimes called a sales page or the landing page).
A site which is simple and benefit-oriented will make the course more attractive to prospective students. Why should someone choose your course over another one? It's all about what you can offer to your client. Pages that convert well typically have attention-grabbing copy and visuals representing all the benefits and closing with a clear call-to-action.
Then, you must open the Website
Click on the Website to load it, and to create your headline, image as well as copy.
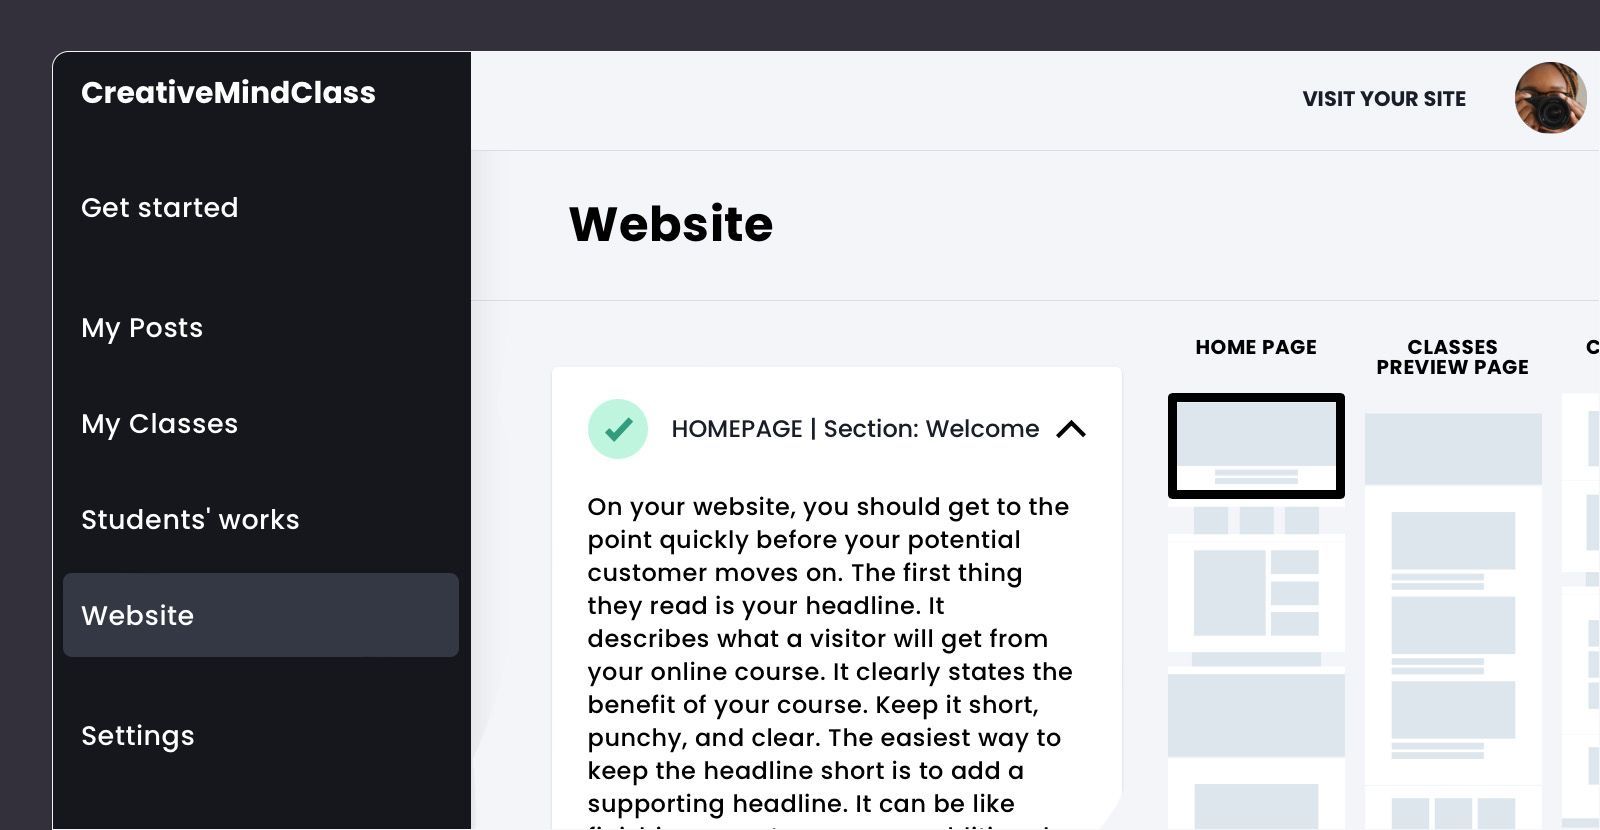
How do I get it in CreativeMindClass
- Click the Websitein Main Menu to launch it.
Attract the attention of your visitor
On your website, you should get to the point quickly before your potential customer moves on.
The first thing they look at is your headline. The headline explains what visitors is going to get when they take your photography online course. It clearly describes the advantages of the course.
Keep it short, punchy and concise. One of the easiest ways to ensure that the headline stays short is to add another headline. It can be like finishing a sentence or another sentence that supports the primary assertion.
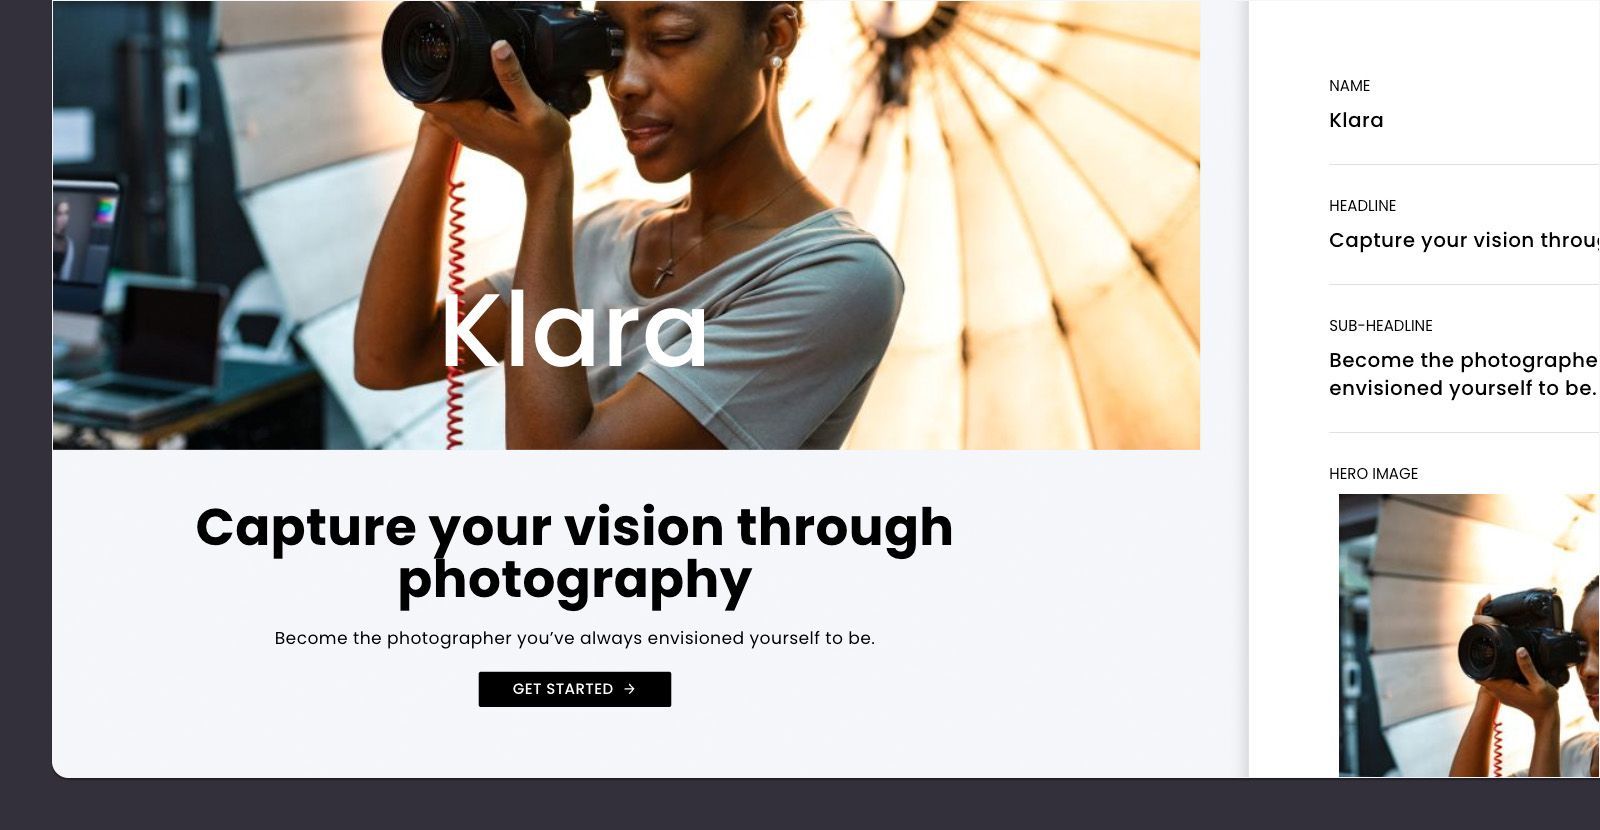
How to do it within CreativeMindClass
- Click the on Edit button in the Welcome section.
- Type HEADLINE. As an example, "Capture your thoughts by taking photos".
- Write a the SUB-HEADLINE. For example "Become that photographer you've always envisioned yourself to be".
Add inspiring visuals
The image of the hero (or background image) you add to the top part of the course website help visitors understand what you offer.
What does the hero image say about the benefits of your online photography course? Imagine your customer's potential in a scenario you've prepared to help them. If you've developed a training course such as taking dog pictures You can create the collage of photos or even a background video with the final images. Your images should be huge, crisp, and high-quality.

How to do it in CreativeMindClass
- Click the on Edit button in the the Welcome section.
- Click HERO Image, BACKGROUND VIDEO or an animationto upload your own images.
Start your course
Give some information on the online photography class.
What does it do? What is the duration? How many lessons do you offer? Do you give any bonus items? What is the course's project? What is the purpose of the course?
These details help customers who browse your site quickly to understand what they're buying.
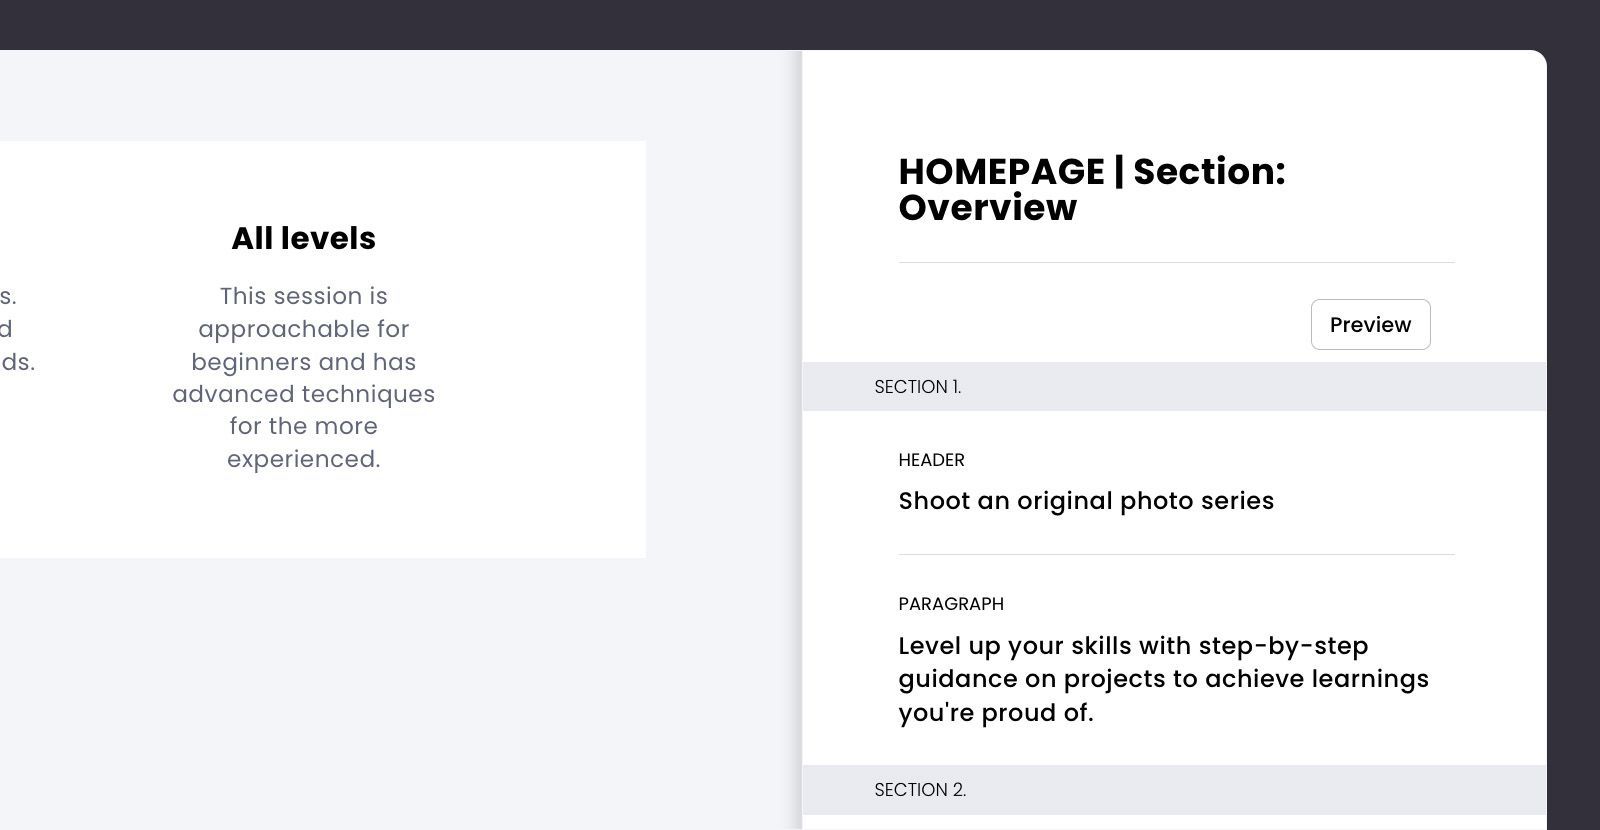
How to do it within CreativeMindClass
- Click the Edit button on the Overview section.
- Type Header. Example: "Shoot the original picture series".
- Enter a PARAGRAPH. Use PARAGRAPH.For instance, "Level up your skills by following step-by-step instructions on assignments to attain learnings that you're happy about".
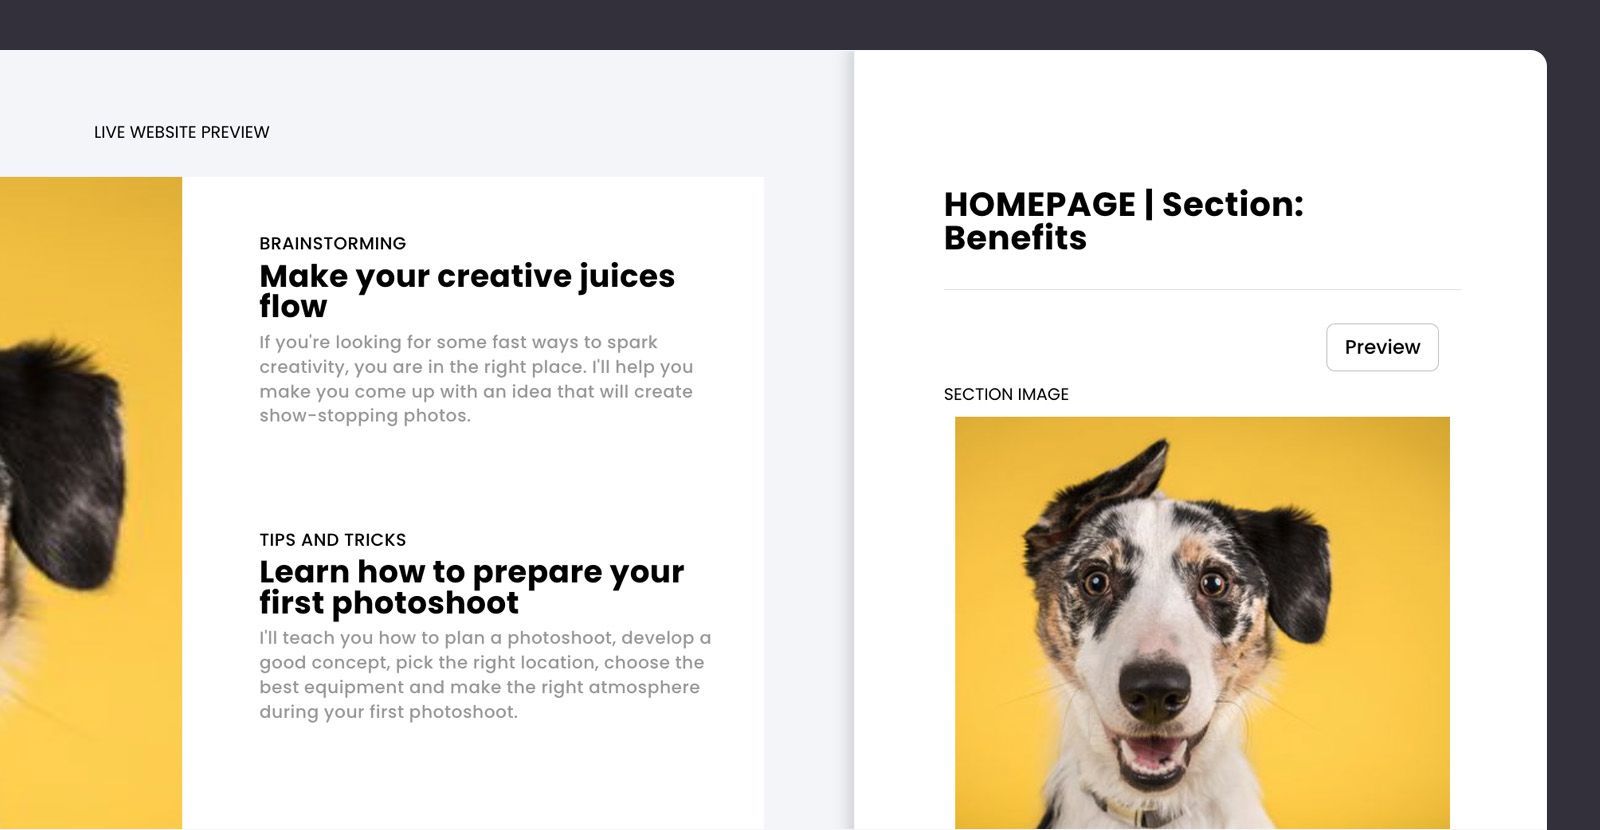
Highlight benefits
The benefits clearly stated will convince the majority of people. Give more details about your course, learning outcomes, and its worth.
What skills will they learn? What will the class do for students? What is the transformation they undergo? How do you tackle the problems?
A simple way to draw attention to the benefits of a product is to compose the benefit in a concise, lively, and clear head. Add a second subheader supporting the primary statement. Within the paragraphs, you should compose a brief description of the primary learning outcomes, and describe simply the benefit you're providing.
Another way to highlight benefits of your course is to make use of an appealing image.
How do I get it within CreativeMindClass
- Click the Edit button in the Benefits section.
- Type HEADER. For example "Make your creativity run".
- Create a Type the SUB-HEADER. As an example, "Get an incredible idea".
- Type PARAGRAPH. For example "If you're searching for fast ways to spark imagination, then you're in the right place. We'll aid you in helping you develop an idea that will create show-stopping photographs ".
- Click SECTION IMAGEand upload your image. PRO TIP: Focus on the three primary benefits. Make the text short and simple to keep readers' attention. Removing anything that's hard to follow.
Give a taste of your course
A person who's browsing to buy your online photography course would like to see an idea of the contents. Make that with a jaw-dropping promotional trailer. To create a promotional trailer, you can create a cool and engaging video that runs between 30 and 60 seconds.
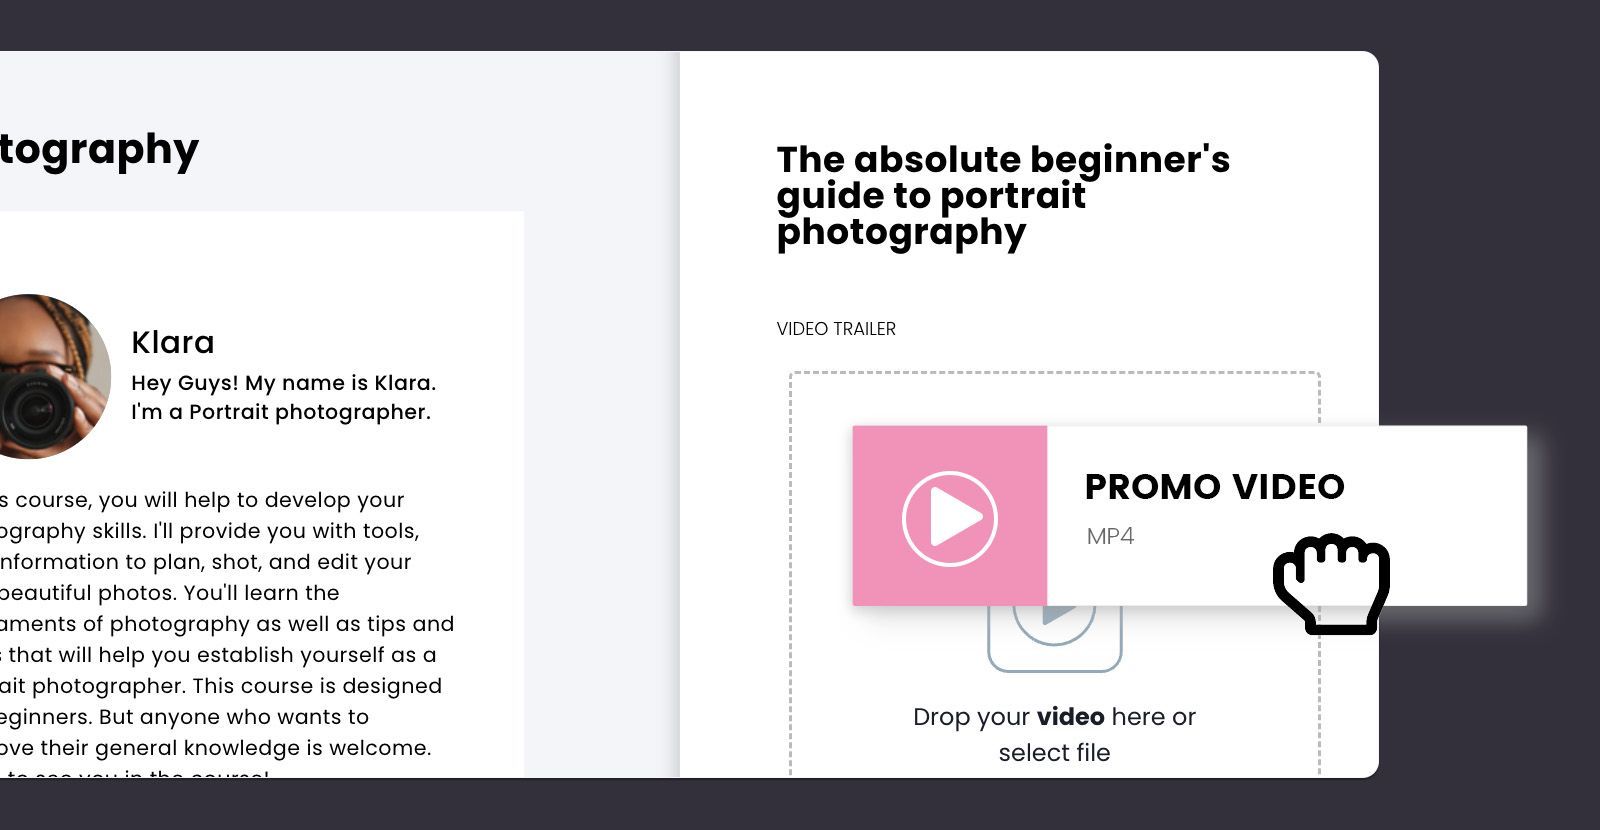
What is it? in CreativeMindClass
- Simply click My Classesin the main menu, to launch it.
- In class, click the Class page tab to display it.
- Click VIDEO TRAILERto upload your promo video.
Use it to share with your audience
Congratulations! After you've created your course website Your web-based photography course is complete. It's an exciting time following all the work.
Another type of work is about to begin! Now is the time to share your work with your followers. Include the URL to your website as well as social media, email, or blog, and start the promo campaign. Pro Tip: Prior to you share the course with your audience, make sure that your class, all courses, and assignments are published.
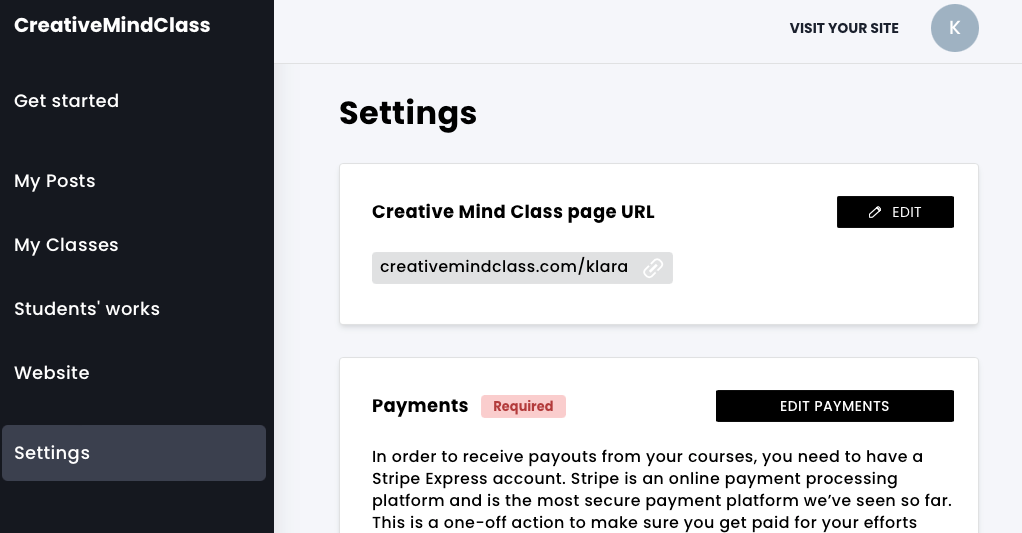
How to do it in CreativeMindClass
- Click Settingsin the main menu, then click Settings to start it.
- Copy CreativeMindClass web address.
- Make sure you share the lesson with the audience.
You're all done!
I hope this article helped you become more organized and provided you with the necessary room to make the best learning experience for your students.
If you're starting an online photography class you can use this template for setting up the course in minutes. The template is the ultimate time saver when you're creating your online course. It's designed to convert (sell the course), and it's got everything you need, waiting for your finishing touch. Slap on your photos edit the copy, add images, and voila! You've just created an effective online photography class. It's really that easy.
Design your photography online course online. Today.
Get started for FREE with our template.

- Start creating your photography course
Join for free and there is no limit on time SHARE The link has been copied!
It is also possible to like

What is the way online courses work and why you should Be Concerned?
![Best Platforms to Create and Sell Online Courses [Updated August 2022]](https://alwaysoutsource.com/content/images/2022/11/online-course-platforms-1.jpg)
The best platforms to create and sell Online Courses [Updated August 2022[Updated August 2022]

A Mini Course: The Most Effective way to Get Started with Online Courses

How do I Create an Online Course

An Introduction to selling online courses
Teach with video exercise, feedback and exercises using a stand-alone platform Get started today and create inspirational online courses and to sell your products globally CREATE YOUR COURSE -- it's free Credit card not required
CreativeMindClass is a growing community of teachers, creators and students alike. They connect on the platform for learning to make, teach, learn to connect, and incite.
Teaching Platform
Magazine
- Beginning's guide
- about the blog
- Submissions
- Newsletter CreativeMindClass Blog CreativeMindClass Blog (c) 2022. All Rights Reserved.
Article was first seen on here